Mikrotik Router OS basic configuration only explains installation and a simple config just to enable the internet for personal devices.
A Mikrotik Router OS basic configuration can be performed using Winbox or directly through Mikrotik command line. First, if you do not have a dedicated Mikrotik router (routerboard), you can use an old computer to install Router OS.
Installing Mikrotik Router OS in x86 machine- Computer.
- Insert Mikrotik cd in your cd/dvd drive.
- Configure Bios to boot from cd.
- Power on your old computer. Mikrotik installer will not ask you to boot from cd. When you power on your computer, files will start loading to the crucial step of installing Router OS.
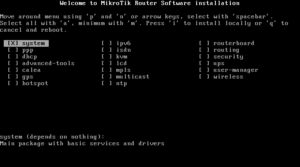
- Select all packages with “A”, or chose custom packages with “Space”.
- Press “I” to install selected packages.
- Press “N” to skip or “Y” to keep old configuration.
- To continue with installation, press Y. Mikrotik Installer will create and format new partition. When Mikrotik Installer format the partition and install system and packages, you will see a message “Software Installed. Press ENTER to reboot”.
- Do not press ENTER, first remove cd from the cd/dvd drive then press ENTER. Now, the new installed Router OS will boot from hard drive.
Mikrotik Router OS first access through Winbox.
For beginners, it’s recommnded to configure Mikrotik through Winbox.
- Download and run Winbox from official site. Winbox is an portable app to configure router from Windows. So, there is no need to install it, just click and run.
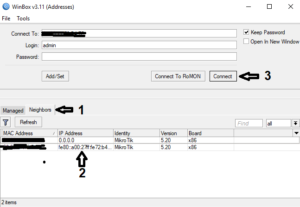
- Use the Neighboars button to browse for Mikrotik devices. If blocked by firewall, click to allow.
- Click in the Mac Address or in IP v6, detected from Winbox then click Connect.
In some cases the Mikrotik Router is not detected because of the Windows firewall configuration or any other reason. In this case you need to make a small configuration through Command Line.
Now, go to the PC that has installed the Mikrotik Router OS. You probably have a keyboard connected to that router.
- Log in, default username: is admin, by default new installed Router OS has no password so, type username admin then press ENTER twice.
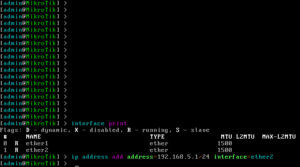
- Identify interfaces (network cards), enter command: interface print. In our example we have two interfaces: ether1 and ether2. We need to choose which Interface will connect the router to the Internet, and which interface will connect the router to the local network that will serve the Internet. In this case we are choosing ether2 for the local network, and ether1 for the internet.
- Now, enter command: ip address add address=192.168.5.1/24 interface=ether2
Go back to Windows PC. Configure IP Address in Computer then open Winbox.
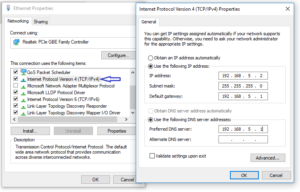
Since we have set the IP address: 192.168.5.1/24 on the router, in the Windows PC we have to put an ip like this:
Ip Address: 192.168.5.2, Subnet mask: 255.255.255.0, Gateway:192.168.5.1, 1st Dns: 192.168.5.1, 2nd Dns: leave blank.
- Now, open Winbox, and in the “Connect to” field enter ip address: 192.168.5.1.
- In the “Login” field enter: admin.
- Password field leave blank.
- Click “Connect“.
Configure Mikrotik Router OS internet connection.
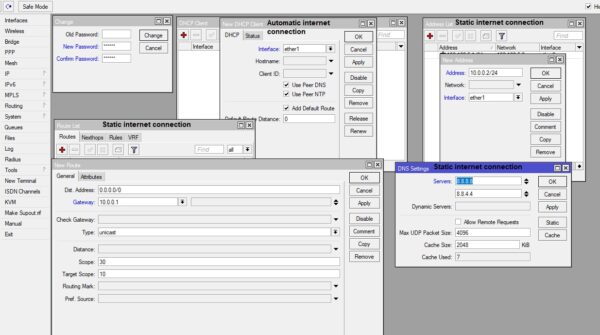
- Setup an password: Click System, Password, enter same password in New Password and Confirm Password, click Change.
- Configure Firewall: Click Ip, Firewall, Nat, Add, in General tab Chain field choose srcnatin General tab Interface field choose ether1, in Action tab Action field choose Masquerade, click OK.
-
- Internet connection with Automatic IP Address: Click Ip, DHCP Client, click add, select ether1, click OK.
- Internet connection with Static IP Address: Click IP, Address, add, enter ip address provided by your ISP, eg 10.0.0.2/24. Click IP, Route,Add, in Gateway enter IP provided by your ISP, click OK. Click IP, Dns, enter DNS from your ISP, click OK.
Configure Mikrotik Router OS Lan connection.
- Add Local IP Address. We put an ip address earlier with Command Line. So, if you have not done this Click IP, Address, Add, In the Address field enter 192.168.5.1/24, In the Network field enter 192.168.5.0, In the Interface field select ether2, click OK.
- Finally, configure DHCP Server. Click IP, DHCP Server, DHCP Setup, Select ether2, click Next, in the DHCP Address space enter 192.168.5.0/24, click Next, In the Gateway for DHCP Network enter 192.168.5.1, click Next, In the Adresses to give out enter 192.168.5.2-192.168.5.254, click Next, in the DNS Servers enter DNS Adresses from your ISP eg 8.8.8.8 and 8.8.4.4, Click Next, Next, OK.

